How to Fix AI Anatomy Errors: Hands, Faces, and Bodies Complete Guide 2025
Practical techniques to fix AI-generated anatomy problems. Hands, faces, fingers, poses, and body proportions - with inpainting, outpainting, and prevention tips.

AI anatomy errors are the biggest tell that an image is AI-generated. Extra fingers, merged limbs, distorted faces—these issues plague even the best models. But they're fixable. Here's how to both prevent and repair anatomy problems.
Quick Answer: Fix AI anatomy through: inpainting (redraw specific areas), using anatomy-focused negative prompts, employing better models (Pony, CyberRealistic), using ControlNet for pose guidance, and post-processing with specialized tools. Prevention is easier than fixing—configure correctly before generating.
- Hand errors are the most common problem - use specific negative prompts
- Inpainting fixes most issues without regenerating entirely
- Better models have fewer anatomy issues (SDXL/Pony better than SD1.5)
- ControlNet with OpenPose can force correct anatomy
- Some issues are model limitations, not prompt problems
- Prevention through proper technique is faster than fixing
Why AI Struggles with Anatomy
Understanding the problem helps solve it:
Training Data Issues
AI models learn from images. When those images show:
- Varied hand positions (complex to learn)
- Overlapping body parts
- Unusual angles
The model gets confused. It hasn't "learned" anatomy—it's learned patterns that sometimes look like anatomy.
Diffusion Process Problems
During generation:
- Early steps establish basic structure
- Later steps add detail
- If structure is wrong early, details can't fix it
- Hands/faces are high-detail areas prone to errors
Why Hands Are Hardest
Hands are uniquely difficult because:
- Five fingers (specific number matters)
- Complex articulation
- Often small in frame
- Position varies dramatically
- Often partially occluded
The model sees thousands of hand positions but struggles to learn the consistent "five fingers" rule.
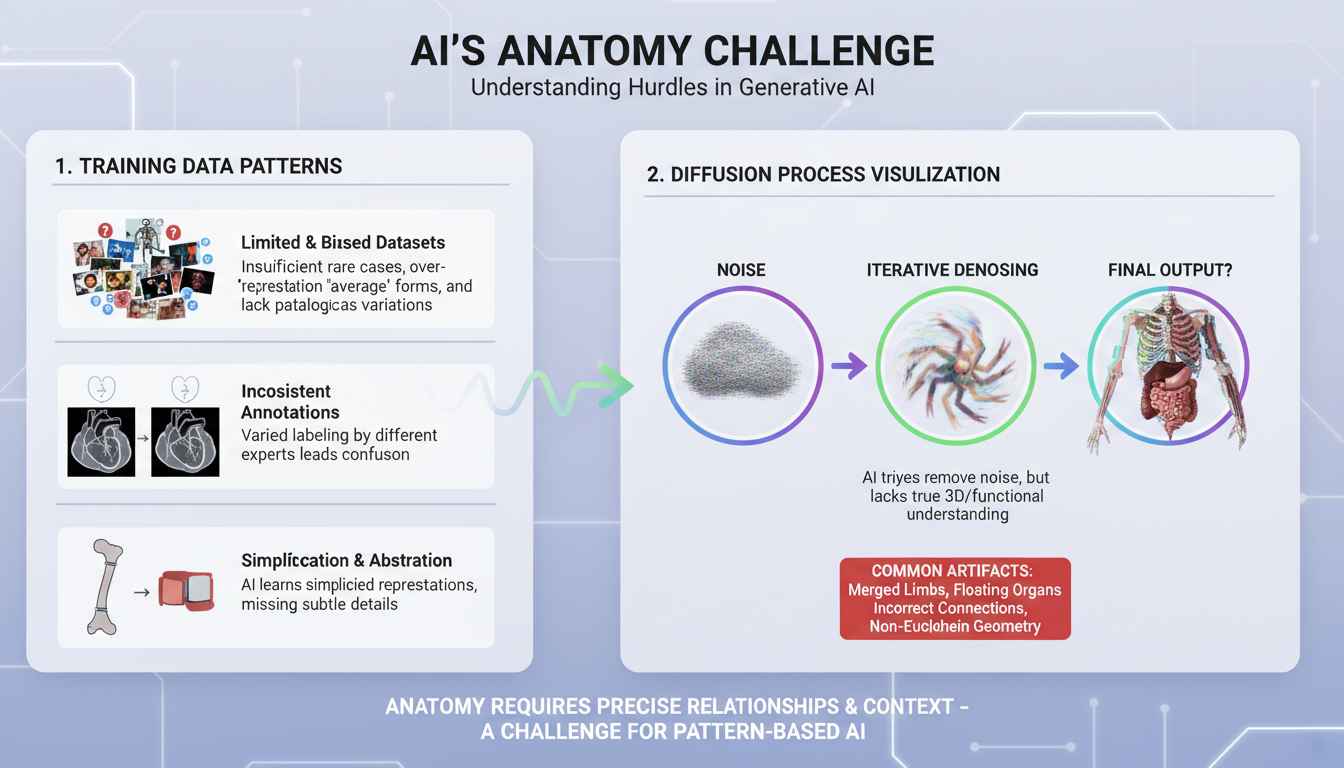 Understanding why anatomy fails helps you fix it
Prevention: Better Than Fixing
The best fix is preventing issues from occurring.
Use Better Models
For realistic anatomy:
- CyberRealistic (excellent anatomy)
- epiCRealism (strong bodies)
- Realistic Vision (balanced)
For anime:
- Pony Diffusion V6 (trained on good anatomy)
- Illustrious XL (clean results)
Avoid:
- Old SD 1.5 models for complex anatomy
- Untested models from unknown sources
Negative Prompts for Anatomy
Essential negative prompt additions:
bad anatomy, bad hands, missing fingers, extra fingers, fewer digits, extra digit, mutated hands, poorly drawn hands, malformed hands, fused fingers, too many fingers, long fingers, extra limbs, extra arms, extra legs, malformed limbs, missing arms, missing legs, extra fingers, mutated, deformed, blurry hands, cropped, out of frame, bad proportions, gross proportions, cloned face, disfigured, ugly
For faces specifically:
bad face, distorted face, asymmetric face, extra eyes, deformed eyes, missing eyes, crossed eyes, blurry face, bad teeth, missing teeth
For bodies:
bad proportions, long neck, long torso, missing limbs, extra limbs, floating limbs, disconnected limbs, mutation, deformed body
Prompt Structure for Anatomy
Structure prompts to emphasize anatomy:
Good structure:
masterpiece, best quality, [subject], detailed hands, anatomically correct, [rest of prompt]
Adding specifics:
hands at sides, hands visible, five fingers, [pose description]
Avoiding complexity:
- Simpler poses = fewer errors
- Hands at sides or behind back = easier
- Fewer overlapping body parts = cleaner results
Resolution Matters
Low resolution causes anatomy issues:
- Not enough pixels for hand details
- Faces get blocky
- Bodies look wrong
SD 1.5: Minimum 512x768 for figures SDXL/Pony: Minimum 1024x1024 or 832x1216
Higher resolution gives the model more space for details.
Inpainting: The Primary Fix
Inpainting is redrawing a specific area while keeping the rest intact.
How Inpainting Works
- Select the problem area (mask)
- AI regenerates only that area
- Blends with surrounding image
- Repeat until correct
Inpainting in ComfyUI
Basic setup:
Free ComfyUI Workflows
Find free, open-source ComfyUI workflows for techniques in this article. Open source is strong.
- Load your image
- Add "Load Image (as Mask)" or use mask editor
- Draw mask over problem area
- Connect to inpaint workflow
- Set denoise (0.5-0.8 typically)
- Generate
Key settings:
- Denoise 0.4-0.6: Subtle changes, keeps more original
- Denoise 0.7-0.9: Significant redraw, better for major fixes
- Denoise 1.0: Complete redraw, like new generation
Prompt for inpainting: Include specific description of what you want:
detailed hand, five fingers, relaxed pose, realistic skin
Inpainting in Automatic1111
- Go to img2img tab
- Click "Inpaint" sub-tab
- Upload image
- Draw mask with brush
- Set denoising strength
- Write prompt for masked area
- Generate
Tips:
- "Inpaint masked" mode
- "Mask blur" 4-8 for blending
- Match prompt to desired result
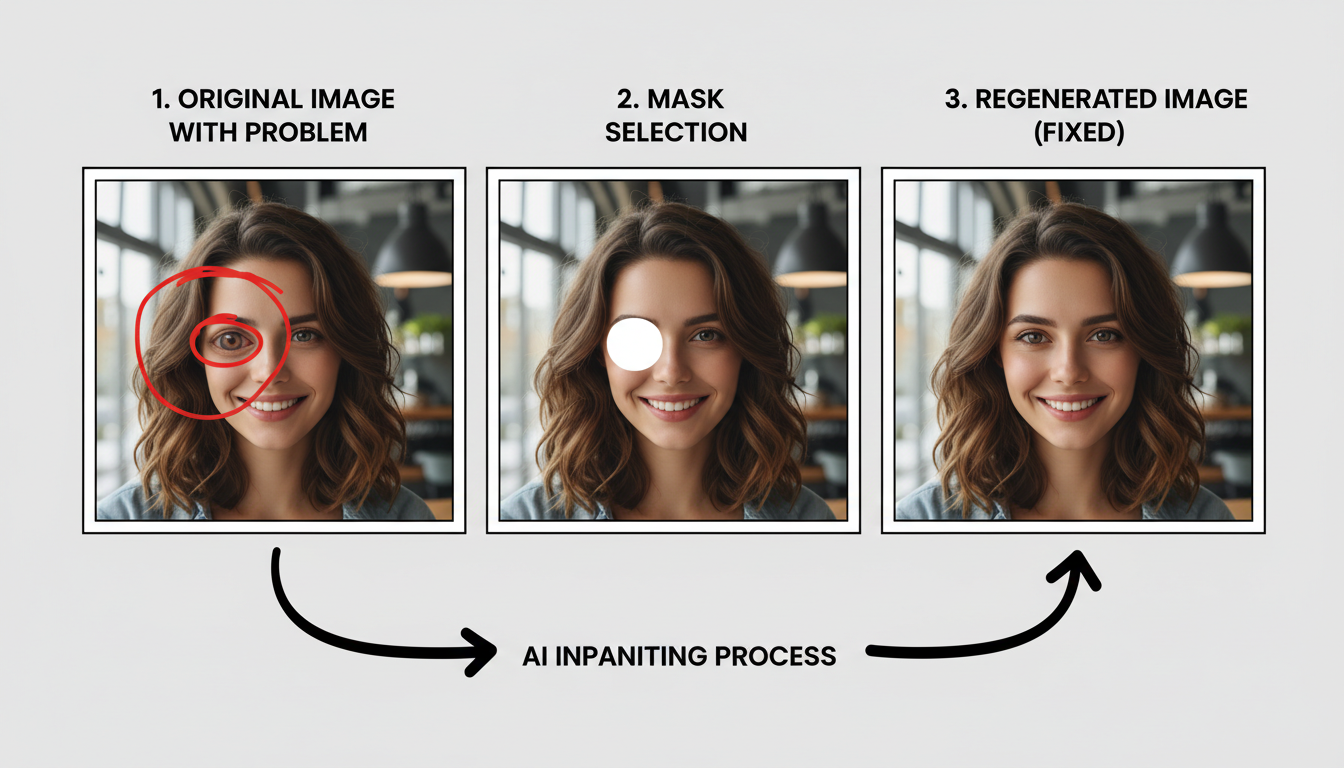 Inpainting fixes specific areas without regenerating everything
Inpainting Strategy
For hands:
- Mask the entire hand generously
- Include some wrist/arm
- Denoise 0.6-0.8
- Prompt: "detailed hand, five fingers, [position]"
- Generate multiple, pick best
- Repeat if needed
For faces:
- Mask face area only
- Include some hair/neck edge
- Denoise 0.4-0.6 (preserve identity)
- Prompt: focus on expression, features
- Lower CFG sometimes helps
For bodies:
- Mask the problem area
- Denoise based on how much needs changing
- Match lighting and style in prompt
- May need multiple passes
ControlNet for Anatomy
ControlNet forces specific anatomy by using reference poses.
OpenPose Control
OpenPose detects body poses and guides generation:
- Get pose reference
- Use OpenPose preprocessor on reference image
- Or create pose manually
- Or use pose libraries
- Configure ControlNet
- Load OpenPose model
- Set strength (0.7-1.0 for strict control)
- Connect to workflow
- Generate
- Model follows pose guide
- Anatomy matches reference
- Much fewer errors
Depth Control
Depth maps help with proportions:
- Prevents floating limbs
- Maintains spatial relationships
- Good for complex scenes
Combining Controls
Use multiple ControlNet models:
Want to skip the complexity? Apatero gives you professional AI results instantly with no technical setup required.
- OpenPose for pose
- Depth for space
- Canny for details
More control = fewer anatomy issues.
Fixing Specific Problems
Extra/Missing Fingers
Prevention:
Negative: extra fingers, fewer digits, missing fingers, fused fingers, too many fingers, extra digit
Fix:
- Inpaint entire hand area
- Prompt: "detailed hand, exactly five fingers, realistic"
- High denoise (0.7-0.8)
- Generate multiple variations
- Pick best or composite
Alternative: Pose hands behind back, in pockets, or obscured
Merged/Fused Limbs
Prevention:
- Simpler poses
- Fewer overlapping body parts
- Clear spatial separation in prompt
Fix:
- Inpaint the merged area
- Prompt clearly separated limbs
- May need to describe each limb
- Use ControlNet for complex fixes
Distorted Faces
Prevention:
Negative: distorted face, asymmetric face, blurry face, bad face, disfigured
Positive: detailed face, beautiful face, symmetric features
Fix:
- Inpaint face only
- Lower denoise (0.4-0.5) to preserve identity
- Match expression in prompt
- Face restoration tools (GFPGAN, CodeFormer)
Wrong Proportions
Prevention:
- Higher resolution
- Better model
- Negative prompts for proportions
Fix:
- Inpaint larger area
- May need body-focused model
- ControlNet with proportion reference
- Sometimes requires regeneration
 With proper technique, most anatomy issues are fixable
Earn Up To $1,250+/Month Creating Content
Join our exclusive creator affiliate program. Get paid per viral video based on performance. Create content in your style with full creative freedom.
Post-Processing Tools
Face Restoration
CodeFormer:
- Excellent face reconstruction
- Available in A1111 and ComfyUI
- Adjust strength to balance
GFPGAN:
- Good for general face fixes
- Fast processing
- Can over-smooth
Specialized Tools
Topaz Gigapixel:
- Paid upscaler
- Good for adding detail
- Can help with faces
Repainting manually:
- Photoshop/GIMP for final touches
- Clone stamp for small fixes
- Blend layers for compositing
Combining Multiple Outputs
When single generation fails:
- Generate multiple versions
- Composite best parts
- Take hands from one, face from another
- Blend in image editor
Model-Specific Tips
For Realistic Content
Best models:
- CyberRealistic
- epiCRealism
- Realistic Vision
Key techniques:
- Detailed negative prompts
- Higher CFG (6-8)
- More steps (30-40)
- Resolution 768+ for figures
For Anime Content
Best models:
- Pony Diffusion V6
- Illustrious XL
Key techniques:
- Danbooru-style tags
- Anime-specific negatives
- Style tags affect anatomy
- Lower CFG often (5-7)
For Action and Dynamic Poses
Anatomy is especially difficult in motion:
- Twisted torsos and bent limbs confuse the model
- Hands interacting with objects frequently fail
- Foreshortened limbs get flattened or warped
Recommendations:
- Use models trained on dynamic poses (Pony, CyberRealistic)
- Or use platforms with quality control (Apatero)
- Apply pose ControlNet for complex angles
- Multiple generation passes with seed variation
Workflow for Quality Anatomy
Step 1: Setup
- Choose appropriate model
- Include anatomy negatives
- Set proper resolution
Step 2: Initial Generation
- Generate multiple variations (5-10)
- Keep anatomy issues minimal
- Select best starting point
Step 3: First Fix Pass
- Inpaint obvious problems
- Focus on worst issues first
- Save intermediate results
Step 4: Detail Pass
- Fine-tune remaining issues
- Lower denoise for subtle fixes
- May need specialized tools
Step 5: Final Quality Check
- Zoom to 100%
- Check all hands visible
- Verify face consistency
- Review body proportions
When to Regenerate vs Fix
Fix When:
- Only one or two problems
- Overall image is good
- Inpainting area is small
- Problem is clear (extra finger, etc.)
Regenerate When:
- Multiple anatomy issues
- Fundamental pose problem
- Proportions are severely wrong
- Fixing would take longer than regenerating
Time-to-Quality Ratio
Quick check:
- Simple hand fix: 2-5 minutes
- Face adjustment: 1-3 minutes
- Major body repair: 10-15 minutes
- Full regeneration: 1-2 minutes
If fixing takes longer than regenerating several times, regenerate.
Frequently Asked Questions
Why does AI struggle with hands?
Hands have specific structure (five fingers) that varies dramatically across poses. The model learns patterns, not rules, so it doesn't "know" five fingers is correct.
Can I completely prevent anatomy issues?
No, but you can minimize them significantly. Even the best models occasionally produce errors. Build fixing into your workflow.
What's the fastest way to fix hands?
Inpainting with high denoise (0.7-0.8) and specific hand prompt. Generate 3-5 variations, pick the best. Usually takes 2-5 minutes.
Do newer models have better anatomy?
Generally yes. SDXL-based models (Pony, Illustrious) are significantly better than SD 1.5 models. But no model is perfect.
Should I use ControlNet for every generation?
Not necessarily. For simple poses, good prompts are enough. Use ControlNet for complex poses, multiple figures, or when you need specific positioning.
Is it better to fix or hide problem areas?
If you can naturally hide it (hands in pockets, hair over part of face), that's often faster. But for important images, fixing produces better results.
Recommended Workflow
For production content:
- Use quality model (Pony, CyberRealistic, or cloud platform like Apatero)
- Include comprehensive negative prompts
- Generate at appropriate resolution
- Batch generate, curate best
- Inpaint remaining issues
- Final quality check
- Output
For quick generation:
- Simpler poses (fewer anatomy challenges)
- Strategic composition (hands less visible)
- Accept minor imperfections
- Fix only obvious issues
Final Thoughts
AI anatomy errors are common but manageable. The key is:
- Prevention: Good models, proper negatives, appropriate resolution
- Selection: Generate multiple, pick the best starting point
- Inpainting: Fix specific areas efficiently
- Acceptance: Some imperfection is normal—fix what matters
Every AI creator deals with anatomy issues. The difference between amateur and professional output is knowing how to fix them efficiently.
Build fixing into your workflow rather than hoping for perfect generations. With practice, you'll spend less time fixing and produce better results overall.
*Related guides: ComfyUI Beginners Guide, Stable Diffusion Generation Settings, *
Ready to Create Your AI Influencer?
Join 115 students mastering ComfyUI and AI influencer marketing in our complete 51-lesson course.
Related Articles

Adobe Firefly vs Midjourney vs Ideogram 2026: Which Wins
Brand-safe licensing, scroll-stopping aesthetics, or text rendering. Three tools optimized for three different jobs, tested against real briefs.

AI Art Market Statistics 2025: Industry Size, Trends, and Growth Projections
Comprehensive AI art market statistics including market size, creator earnings, platform data, and growth projections with 75+ data points.

AI Automation Tools: Transform Your Business Workflows in 2025
Discover the best AI automation tools to transform your business workflows. Learn how to automate repetitive tasks, improve efficiency, and scale operations with AI.