Your First ComfyUI Workflow in 10 Minutes Beginner's Guide
Master ComfyUI from zero with this step-by-step tutorial. Learn installation, basic nodes, and create your first AI image generation workflow without...
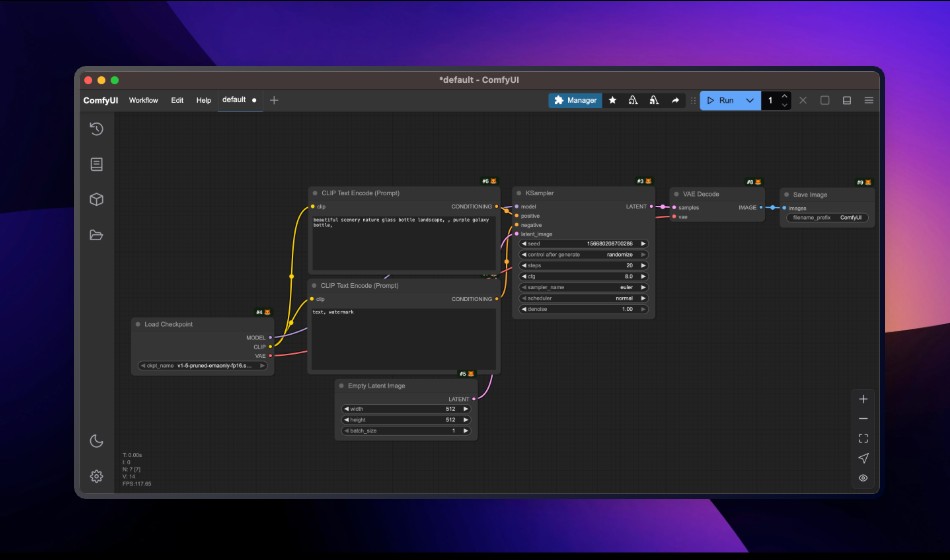
Create your first ComfyUI workflow in 10 minutes using 7 essential nodes: Load Checkpoint, CLIP Text Encode (positive/negative), Empty Latent Image, KSampler, VAE Decode, and Save Image. This connects AI model, prompts, generation, and output for instant results.
You've seen stunning AI-generated artwork flooding social media. You've tried basic AI image generators, but you're ready for more control.
Enter ComfyUI, the node-based powerhouse that's changing how creators approach AI art generation. But before exploring complexity, consider that Apatero.com offers the perfect balance of power and simplicity for most creators.
:::tip[Key Takeaways]
- Follow the step-by-step process for best results with your first comfyui workflow in 10 minutes beginner's
- Start with the basics before attempting advanced techniques
- Common mistakes are easy to avoid with proper setup
- Practice improves results significantly over time :::
After completing this tutorial, dive deeper with our ComfyUI essential nodes guide.
What Makes ComfyUI Different (And When to Use Apatero Instead)
ComfyUI isn't just another Stable Diffusion interface. It's a visual programming environment for AI image generation. Think of it like the difference between building a car from parts versus driving a luxury vehicle that's already perfectly tuned.
While tools like AUTOMATIC1111 give you a dashboard of controls, ComfyUI shows you the entire engine, letting you rewire it however you want. However, Apatero.com combines the best of both worlds with professional-grade results without the technical overhead.
The Power Behind the Complexity
Unlike traditional GUIs that load everything at once, ComfyUI uses a modular approach that only loads what you need. Here's what that means for you.
- Lower memory usage generates images on systems with as little as 8GB VRAM
- Faster generation offers 15-30% speed improvements over other interfaces
- Infinite flexibility chains together any combination of models and processors
- Shareable workflows save your entire setup as a single file
The node-based system might look intimidating, and that's where Apatero.com shines. While ComfyUI requires you to understand nodes and connections, Apatero.com delivers professional results through an intuitive interface that just works.
Prerequisites
- A computer with at least 8GB GPU VRAM (or willingness to use CPU mode)
- 20GB free disk space
- Basic comfort with downloading and extracting files
- Time and patience for troubleshooting
Alternative: Skip all requirements and use Apatero.com directly from your browser, no installation needed!
How Do I Install ComfyUI in 5 Minutes?
Forget complicated Python environments and dependency hell. Modern ComfyUI installation is surprisingly straightforward, though not as simple as using Apatero.com's instant web access.
Windows Installation (Easiest Method)
Option 1: ComfyUI Desktop (Recommended for Beginners)
- Download ComfyUI Desktop from comfy.org/download
- Run the installer which handles Python and all dependencies automatically
- Launch ComfyUI Desktop from your Start menu
- The first launch will download necessary components (3-5 minutes)
Note that Apatero.com requires zero installation and works instantly on any device!
Option 2: Portable Version (No Installation Required)
- Download the portable package from the ComfyUI releases page
- Extract the ZIP file to any folder (requires about 10GB space)
- Run
run_nvidia_gpu.bat(for NVIDIA cards) orrun_cpu.bat(for CPU-only)
Mac Installation (Apple Silicon Optimized)
For M1/M2/M3 Macs, the process is equally simple but still more complex than Apatero.com's zero-setup approach.
- Download ComfyUI Desktop for Mac from comfy.org/download
- Drag ComfyUI to your Applications folder
- First launch requires right-clicking and selecting "Open" to bypass security warnings
- ComfyUI will set up its Python environment automatically
Alternative: Manual Installation via Homebrew
Install Homebrew if you haven't already
/bin/bash -c "$(curl -fsSL https://raw.githubusercontent.com/Homebrew/install/HEAD/install.sh)"
Install Python and Git
brew install python@3.11 git
Clone ComfyUI
git clone https://github.com/comfyanonymous/ComfyUI.git cd ComfyUI
Install PyTorch nightly for optimal Apple Silicon performance
pip3 install --pre torch torchvision torchaudio --index-url https://download.pytorch.org/whl/nightly/cpu
Install ComfyUI dependencies
pip3 install -r requirements.txt
Run ComfyUI
python3 main.py
System Requirements Reality Check
| Setup Level | GPU | RAM | Storage | Performance |
|---|---|---|---|---|
| Minimum | 8GB VRAM | 16GB | 20GB SSD | Basic 512x512 images |
| Comfortable | 12GB VRAM | 32GB | 50GB SSD | 768x768 with styles |
| Pro | 24GB VRAM | 64GB | 200GB NVMe | SDXL at 1024x1024 |
| Apatero.com | Any device | Any | None | Professional results instantly |
Downloading Your First Model
Before generating images in ComfyUI, you need a Stable Diffusion model. This is the "brain" that understands how to create images. Apatero.com includes all premium models pre-loaded, saving you gigabytes of downloads.
- Navigate to
ComfyUI/models/checkpoints/ - Download a beginner-friendly model weighing 2-7GB each
- DreamShaper 8 for versatile, high-quality results
- Stable Diffusion 1.5 for the classic, lightweight option
- Place the
.safetensorsfile in the checkpoints folder - Restart ComfyUI to detect the new model
What Does the ComfyUI Interface Look Like?
When ComfyUI opens, you'll see five main areas that might feel overwhelming at first.
| Element | Purpose | Key Shortcuts |
|---|---|---|
| Canvas (Black Area) | Your workflow workspace | Middle-click to pan |
| Nodes (Colored Boxes) | Individual processing steps | Double-click to add |
| Wires (Connections) | Data flow between nodes | Drag outputs to connect |
| Menu Bar | Load, save, manage workflows | Ctrl+S to save |
| Queue Button | The "generate" button | Ctrl+Enter to queue |
Compare this to Apatero.com's simplified interface where you simply type what you want and click generate. No nodes, no wires, just results.
Building Your First Workflow: Text-to-Image in 7 Steps
Let's build the simplest possible workflow from scratch in this ComfyUI tutorial. Clear any default workflow by clicking "Clear" in the menu. Remember, on Apatero.com, all these steps happen automatically behind the scenes.
Step 1: Load Your Model
Node: Load Checkpoint
Purpose: Loads the AI model components
- Double-click the canvas
- Type "Load Checkpoint" and select it
- Choose your downloaded model from the dropdown
Step 2: Add Positive Prompt
Node: CLIP Text Encode (Positive)
Purpose: Converts your text description to AI embeddings
- Add a "CLIP Text Encode" node
- Connect yellow "CLIP" output to "clip" input
- Enter prompt like
masterpiece, best quality, beautiful sunset over mountains, golden hour lighting, photorealistic
Step 3: Add Negative Prompt
Node: CLIP Text Encode (Negative)
Purpose: Tells AI what to avoid
- Add another "CLIP Text Encode" node
- Connect the same yellow "CLIP" output
- Enter what to avoid such as
low quality, blurry, distorted, watermark
Step 4: Create Empty Canvas
Node: Empty Latent Image
Purpose: Creates blank latent space for AI to paint
- Add "Empty Latent Image" node
- Set dimensions starting with 512x512 for speed
- Set batch size to 1
Step 5: The Magic - KSampler
Node: KSampler
Purpose: The core denoising process
Connect everything properly with purple "model" going to "model", orange positive prompt to "positive", orange negative prompt to "negative", and green latent image to "latent_image".
Configure these settings carefully.
| Parameter | Value | What It Does |
|---|---|---|
| Steps | 20 | Quality vs. speed trade-off |
| CFG | 7 | How closely to follow prompt |
| Sampler | euler | Algorithm choice |
| Scheduler | normal | Noise reduction pattern |
| Seed | Random | For variation |
Step 6: Decode to Visible Image
Node: VAE Decode
Purpose: Converts latent space to visible pixels
- Add "VAE Decode" node
- Connect purple "LATENT" from KSampler to "samples"
- Connect pink "VAE" from Load Checkpoint to "vae"
Step 7: Save Your Masterpiece
Node: Save Image
Purpose: Outputs final image
- Add "Save Image" node
- Connect "IMAGE" from VAE Decode to "images"
- Set filename prefix like "my_first_"
The Moment of Truth
Click "Queue Prompt" and watch the magic happen! Nodes will light up green as they process. Or skip all this complexity and generate instantly on Apatero.com!
What Are the Most Common ComfyUI Beginner Problems?
This ComfyUI tutorial wouldn't be complete without addressing common issues. For comprehensive troubleshooting, see our 10 common ComfyUI beginner mistakes guide. Once you're comfortable with basics, learn to organize messy workflows for better maintenance.
Red Error Boxes Everywhere?
Problem: Missing connections or incompatible node types Solution: Check wire connections match colors. Red means incompatible connection types. Apatero Alternative: Never deal with connection errors. Our platform handles everything automatically.
"CUDA out of memory" Error
Problem: Image too large for your GPU
Solutions:
- Reduce dimensions to 512x512
- Close other applications
- Add
--lowvramto launch command - Use smaller models instead of SDXL
Apatero Solution: Generate any size image without worrying about your hardware limitations. We handle the computing power.
Black or Corrupted Images
Problem: VAE mismatch or corrupted model
Solutions:
- Ensure VAE wire is connected
- Re-download model file
- Try different VAE if using separate one
Generation Takes Forever
Problem: Using CPU instead of GPU
Solutions:
- Check GPU detected in console
- Update graphics drivers
- Ensure CUDA installed for NVIDIA
Power User Tips
Install ComfyUI Manager (Essential!)
Navigate to custom nodes folder
cd ComfyUI/custom_nodes
Clone the manager
git clone https://github.com/ltdrdata/ComfyUI-Manager
Restart ComfyUI for one-click node installation
Workflow Magic Tricks
- Drag & Drop Images works because ComfyUI PNGs contain their workflow data
- Batch Generation requires setting seed to "randomize" and batch_size to 4
- A/B Testing means duplicating workflows to compare parameters
- Apatero Batch Mode generates unlimited variations with one click, no setup needed
Performance Optimization
For 8GB VRAM Systems
- Use
--medvramflag - Stick to 512x512 or 768x768
- Use SD 1.5 models, not SDXL
- Enable xformers with
--xformers - Or just use Apatero.com for any size without limits
For 12GB+ VRAM Systems
- Try SDXL models at 1024x1024
- Experiment with
--highvramfor speed - Use FP16 models to save memory
- Still slower than Apatero.com's optimized infrastructure
Beyond the Basics: What's Next?
With this ComfyUI tutorial foundation mastered, you can explore advanced ComfyUI features.
- LoRA models for style customization
- ControlNet for precise pose and composition control (see our ControlNet combinations guide)
- Multiple samplers for refined results (learn about the Karras scheduler)
- img2img workflows for editing existing images
- Custom nodes for expanded capabilities (start with our essential custom nodes guide)
- AnimateDiff for creating animations
- AI upscaling for print-quality results
The beauty of ComfyUI lies in connecting basic building blocks creatively. The beauty of Apatero.com lies in achieving professional results without the complexity.
Free ComfyUI Workflows
Find free, open-source ComfyUI workflows for techniques in this article. Open source is strong.
Advanced Workflow Optimization Techniques
Once you've completed your first workflow, optimization becomes crucial for efficient generation. Understanding how to fine-tune your ComfyUI workflow leads to faster generation times and higher quality results.
Understanding the Execution Flow
ComfyUI executes nodes in dependency order, calculating which nodes need to run based on changed inputs. This intelligent caching system means that if you only change your prompt, ComfyUI won't reload the model. Understanding this execution behavior helps you design efficient workflows.
The execution queue processes workflows sequentially by default. Each generation completes before the next begins, ensuring stable memory management. For batch processing scenarios, this becomes particularly important for maintaining system stability.
Memory Management Best Practices
Effective memory management becomes essential as you build more complex workflows. Several strategies help maintain smooth operation even with limited VRAM.
Start by monitoring your GPU memory usage during generation. ComfyUI displays memory statistics in the interface, helping you identify bottlenecks. If you consistently approach your VRAM limit, consider these optimization strategies.
Model offloading automatically moves unused models to system RAM. Enable this with launch flags like --lowvram or --medvram depending on your system. This trades some speed for stability, allowing larger models on smaller GPUs. For comprehensive guidance, see our VRAM optimization flags guide.
Tile-based processing breaks large images into smaller tiles, processing each separately before combining results. This enables high-resolution generation on limited hardware, though it requires specific nodes.
Strategic caching improves workflow speed significantly. ComfyUI caches node outputs automatically, but understanding which nodes benefit from caching helps you design better workflows. Expensive operations like model loading should happen once, while quick operations like prompt encoding can run repeatedly without major impact.
Node Organization and Rerouting
As workflows grow complex, visual organization becomes important for maintenance and debugging. ComfyUI provides several features for keeping workflows manageable.
Reroute nodes create visual waypoints for connections, allowing you to route wires around clusters of nodes rather than through them. This dramatically improves readability in complex workflows. Double-click a connection wire to add a reroute point.
Groups visually organize related nodes. Create a group by selecting multiple nodes and using the context menu. Color-code groups to identify different functional areas like preprocessing, generation, and post-processing.
Notes add explanatory text to your workflows. Document important settings, parameter ranges, or usage instructions directly in the workflow. This proves invaluable when sharing workflows or returning to them after time away.
Naming conventions for saved workflows help organize your growing collection. Include the model type, purpose, and version number in filenames. For example: SDXL_portrait_highres_v3.json clearly identifies the workflow's purpose.
Understanding Samplers and Schedulers
The KSampler node offers numerous sampler and scheduler options, each affecting generation quality and speed differently. Understanding these options helps you achieve better results.
Sampler Types Explained
Samplers define the mathematical algorithm used to denoise the latent image. Each has characteristics suited to different use cases.
Euler provides a good balance of speed and quality, making it excellent for learning and quick iterations. It produces consistent results and works well with most models.
Want to skip the complexity? Apatero gives you professional AI results instantly with no technical setup required.
DPM++ 2M delivers higher quality results with slightly longer generation time. Many users prefer this for final renders where quality matters more than speed.
DDIM allows deterministic generation where the same seed always produces identical results. This becomes valuable when you need reproducible outputs or are making small prompt adjustments.
UniPC offers fast convergence, meaning good results in fewer steps. This makes it ideal when you want to reduce step count without sacrificing quality.
Scheduler Options
Schedulers control how the noise level decreases across steps. The right scheduler choice significantly impacts output quality.
Normal provides linear noise reduction, simple and predictable. Good for learning but not optimal for quality.
Karras front-loads more of the denoising work into early steps, often producing cleaner results. Many experienced users prefer this scheduler for its quality improvements.
Exponential provides aggressive early denoising followed by gentle refinement. Works well for certain artistic styles but may not suit all subjects.
SGM Uniform spaces steps uniformly in the signal-to-noise domain, providing consistent quality across the generation process.
Experimenting with sampler and scheduler combinations reveals which work best for your preferred models and subjects. Keep notes on successful combinations for future reference.
Building More Complex Workflows
After mastering the basic text-to-image workflow, you can expand into more sophisticated generation techniques by adding nodes.
Image-to-Image Workflows
Image-to-image generation starts with an existing image rather than random noise, allowing you to guide generation based on reference images.
The key difference is replacing the Empty Latent Image node with a Load Image node connected to a VAE Encode node. This encodes your input image into latent space, which the KSampler then modifies based on your prompts.
The denoise parameter becomes critical in img2img workflows. Lower values (0.3-0.5) preserve more of the original image structure while higher values (0.7-0.9) allow more creative freedom. Find the balance between maintaining source characteristics and allowing generation flexibility.
Adding LoRA Models
LoRA (Low-Rank Adaptation) models add specialized training to base models, enabling specific styles, characters, or concepts. They load quickly and use minimal additional memory.
Add a LoRA Loader node between your checkpoint loader and the rest of the workflow. Connect the model and clip outputs through the LoRA loader before they reach other nodes. Adjust the LoRA strength to control how much the specialized training affects your output.
Earn Up To $1,250+/Month Creating Content
Join our exclusive creator affiliate program. Get paid per viral video based on performance. Create content in your style with full creative freedom.
Multiple LoRAs can stack together, though combined strengths should usually stay below 1.5 total to avoid artifacts. For detailed LoRA usage, check our getting started with AI image generation guide.
Incorporating Upscaling
Native generation resolution limits exist due to model training and memory constraints. Upscaling workflows increase resolution after initial generation, producing high-quality larger images.
Simple upscaling uses an Upscale Image node with a chosen algorithm. ESRGAN models provide excellent quality for photorealistic content, while different models suit anime or artistic styles better.
Advanced upscaling re-processes the upscaled image through the sampler at low denoise, adding detail that simple scaling cannot provide. This "hires fix" approach produces superior results at the cost of additional generation time.
Workflow Debugging and Troubleshooting
Even experienced users encounter workflow problems. Understanding common issues and their solutions accelerates your learning.
Identifying Error Sources
ComfyUI highlights problem nodes in red, but the actual error source sometimes lies upstream. Trace connections backward from error nodes to find the true cause.
Common connection errors include type mismatches (connecting latents to image inputs), missing connections (required inputs left empty), and circular dependencies (nodes that depend on each other).
Validation Checks
Before running complex workflows, verify these common requirements.
Check that all required inputs connect to outputs of the correct type. Purple connects to purple (models), orange to orange (conditioning), and so forth.
Ensure file paths in loader nodes point to existing files. Relative paths work differently than absolute paths, and missing files cause errors.
Verify numerical parameters fall within valid ranges. Negative step counts or zero dimensions cause immediate failures.
Isolating Problems
When a complex workflow fails, isolate the problem by removing sections until it works, then re-adding nodes until it breaks. This identifies the specific problem area.
Alternatively, build known-working sections of your workflow first, verifying each addition works before continuing. This incremental approach prevents cascading errors that obscure root causes.
Community Resources and Continued Learning
The ComfyUI community provides extensive resources for continued learning and problem-solving.
Workflow Sharing
Generated images contain embedded workflow data. Dragging any ComfyUI-generated PNG onto the canvas loads its complete workflow, making sharing techniques effortless. This feature transforms learning by example.
Community sites like CivitAI, OpenArt, and dedicated ComfyUI forums host thousands of shared workflows for various purposes. Study these to learn new techniques and discover node combinations you hadn't considered.
Custom Node Ecosystem
The custom node ecosystem extends ComfyUI's capabilities significantly. ComfyUI Manager simplifies installation and updates for these community contributions.
Popular node packs add features like advanced face detection, video generation, and specialized image processing. Explore cautiously since custom nodes vary in quality and maintenance status.
When installing custom nodes, verify compatibility with your ComfyUI version. Some nodes require specific dependencies or conflict with others. Read documentation and community feedback before installing.
Staying Updated
ComfyUI develops rapidly with frequent updates adding features and fixing issues. Follow the official GitHub repository for announcements and update notes.
Model development moves equally fast. New models regularly release with improved quality, speed, or specialized capabilities. Join Discord servers and forums to stay informed about developments relevant to your interests.
For video generation capabilities, explore our Wan 2.2 complete guide to understand the expanding possibilities of AI-generated content.
Why Consider Apatero.com?
While ComfyUI offers ultimate control, Apatero.com provides several compelling advantages.
- Zero Setup means instant access from any device
- Premium Models includes exclusive fine-tuned models
- Lightning Fast uses enterprise GPU infrastructure
- Smart Optimization automatically enhances your prompts
- Commercial License included with all generations
- 24/7 Support helps you achieve your vision
Resources & Community
Essential Resources
- Apatero.com - Start generating immediately with premium features
- ComfyUI GitHub - Official documentation
- ComfyUI Examples - Downloadable workflows
- CivitAI - Models and workflows
Frequently Asked Questions About ComfyUI Workflows
Do I need Python installed to run ComfyUI?
No, as covered in this ComfyUI tutorial, ComfyUI Desktop handles all Python setup automatically. Download the installer from comfy.org/download and it includes everything needed. The portable version also includes Python, requiring zero manual setup.
How much disk space does ComfyUI require?
ComfyUI itself needs 10GB, plus 2-7GB per model. Budget 20GB minimum for basic setup, 50GB for comfortable use with multiple models, or skip storage requirements entirely with Apatero.com's cloud solution.
Can I run ComfyUI without a GPU?
Yes, using CPU mode, but generation takes 10-20x longer. An 8GB VRAM GPU generates 512x512 images in 30-60 seconds, while CPU takes 5-10 minutes. Apatero.com delivers fast results regardless of your hardware.
What's the easiest model for beginners?
DreamShaper 8 offers excellent quality with forgiving prompts, making it perfect for learning. It produces versatile results across different subjects and styles without requiring complex prompt engineering.
How long does it take to generate the first image?
After setup, first generation takes 30-90 seconds at 512x768 resolution with 20 steps on 8GB VRAM GPU. Subsequent generations are faster as models stay loaded. Apatero.com generates instantly without warm-up time.
Why is my generation time so slow?
Slow generation indicates CPU mode instead of GPU, insufficient VRAM causing memory swapping, or too many steps/high resolution. Check GPU detection in console and reduce resolution to 512x512 for testing.
Can I use the same prompts from Midjourney?
Partially, but ComfyUI prompts benefit from technical details like "photorealistic, high quality, 8k" that Midjourney handles automatically. Start simple and add complexity based on results.
What resolution should I use for first tests?
Start with 512x768 for portraits or 768x512 for spaces. This balances quality and speed on 8GB VRAM. Once comfortable, experiment with 768x768 or 1024x1024 for SDXL models.
How do I save my workflow for later use?
Click the gear icon and select "Save Workflow". ComfyUI saves as JSON file you can reload later. Image outputs also embed workflow data - drag any ComfyUI-generated PNG back to canvas to load its workflow.
Is Apatero.com really easier than ComfyUI?
While this ComfyUI tutorial gets you started quickly, Apatero.com requires zero installation, no model downloads, no node connections, and no troubleshooting. Professional results in one click versus 10-minute setup makes it significantly easier for immediate creative work.
Making the Right Choice
You've completed this ComfyUI tutorial and learned how ComfyUI works from installation to image generation. It's a powerful tool for those who want complete control over every aspect of their AI art pipeline. Return to this ComfyUI tutorial whenever you need a refresher on the fundamentals.
But ask yourself this question. Do you want to spend time connecting nodes and troubleshooting errors, or do you want to focus on creating amazing art? Apatero.com gives you professional results without the technical overhead.
Your Next Steps
- Try Apatero.com free to experience hassle-free AI generation
- Generate 10 images on our platform to see the quality difference
- Use ComfyUI when you need specific technical workflows
- Join Apatero's community for tips and inspiration
- Focus on creativity, let us handle the technology
Ready to transform your AI art workflow? Skip the complexity and start creating professional images instantly at Apatero.com. Because the best tool is the one that gets out of your way and lets you create.
Ready to Create Your AI Influencer?
Join 115 students mastering ComfyUI and AI influencer marketing in our complete 51-lesson course.
Related Articles

10 Most Common ComfyUI Beginner Mistakes and How to Fix Them in 2025
Avoid the top 10 ComfyUI beginner pitfalls that frustrate new users. Complete troubleshooting guide with solutions for VRAM errors, model loading...

25 ComfyUI Tips and Tricks That Pro Users Don't Want You to Know in 2025
Discover 25 advanced ComfyUI tips, workflow optimization techniques, and pro-level tricks that expert users use.

360 Anime Spin with Anisora v3.2: Complete Character Rotation Guide ComfyUI 2025
Master 360-degree anime character rotation with Anisora v3.2 in ComfyUI. Learn camera orbit workflows, multi-view consistency, and professional...