What is img2img? Complete Guide to Image-to-Image AI Generation
Learn what img2img is and how image-to-image generation works in Stable Diffusion and other AI models. Beginner-friendly explanation with practical examples.
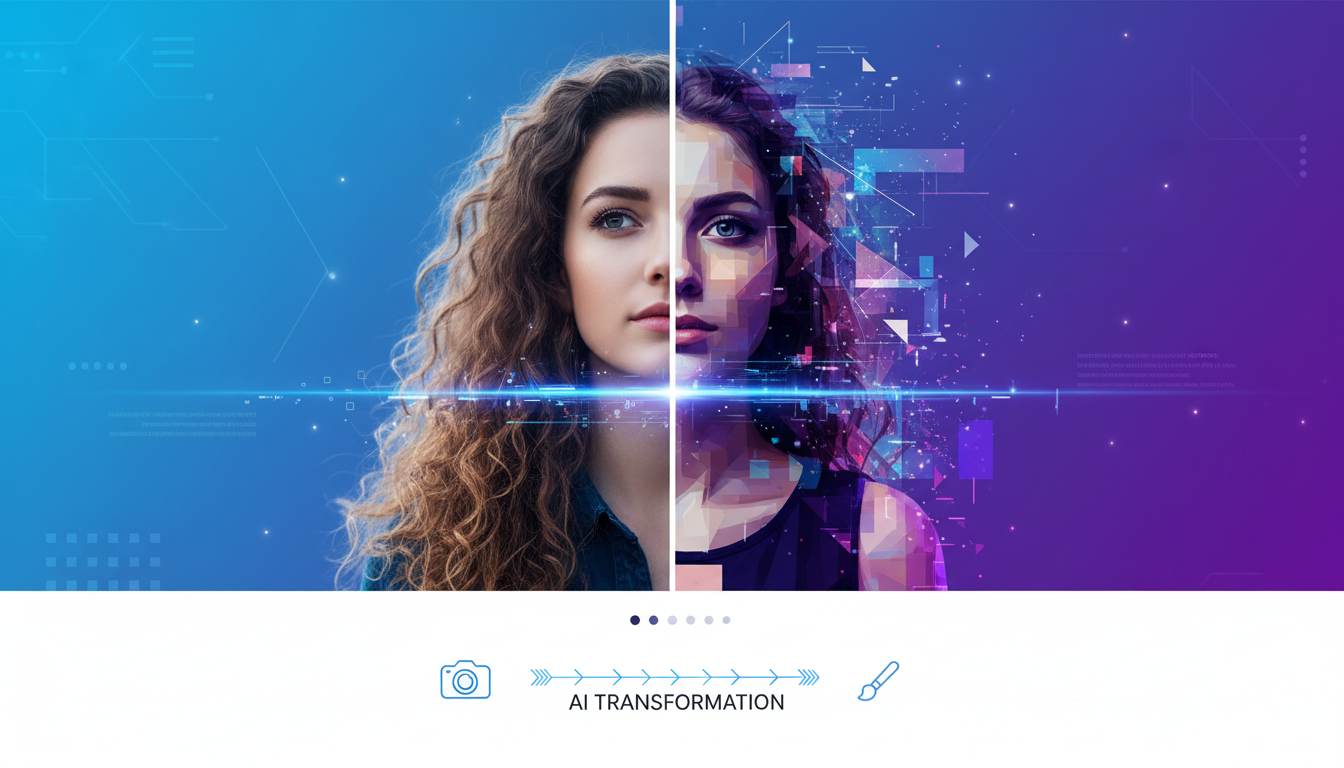
Text-to-image gets all the attention, but img2img is often more useful in practice. Instead of generating from nothing, you start with an existing image and transform it. This guide explains exactly how img2img works and when to use it.
Quick Answer: img2img (image-to-image) is an AI generation mode where you provide an input image that gets partially noised, then denoised according to your text prompt. The result keeps structural elements from the original while applying new styles, details, or modifications. Denoise strength controls how much the AI changes: low values keep the original mostly intact, high values allow dramatic transformation.
- img2img transforms existing images using AI
- Denoise strength controls transformation amount (0.3-0.8 typical)
- Uses: style transfer, refinement, upscaling, inpainting, variations
- Preserves composition while changing appearance
- Essential skill for production AI workflows
What img2img Actually Does
Text-to-Image vs Image-to-Image
Text-to-image (txt2img):
- Starts from pure noise
- AI has total creative freedom
- Results entirely determined by prompt and seed
- No structural reference
Image-to-image (img2img):
- Starts from your input image
- AI works within existing structure
- Results guided by both image AND prompt
- Maintains composition, changes details
Think of txt2img as asking an artist to paint from imagination. img2img is showing them a rough sketch and asking them to finish it.
The Technical Process
- Input image loaded: Your source image is processed
- Noise added: Random noise partially covers the image (controlled by denoise strength)
- Denoising: AI removes noise while following your prompt
- Output: Result maintains structure from input but applies prompt guidance
The magic is in step 2: less noise means more original image preserved. More noise means more freedom for the AI to change things.
Understanding Denoise Strength
Denoise strength is the single most important img2img parameter. It controls how much the AI can change.
Denoise Strength Values
0.0-0.2 (Very Low):
- Minimal change
- Subtle style adjustments
- Colors shift slightly
- Structure completely preserved
- Use for: minor corrections, color grading
0.3-0.4 (Low):
- Noticeable but controlled changes
- Details refined
- Style applied gently
- Core composition intact
- Use for: gentle style transfer, refinement passes
0.5-0.6 (Medium):
- Significant transformation
- Major style application
- New details emerge
- Basic shapes preserved
- Use for: style transfer, artistic interpretation
0.7-0.8 (High):
- Dramatic changes
- Original barely recognizable
- AI has creative freedom
- Only rough composition preserved
- Use for: complete reimagining, major modifications
0.9-1.0 (Very High):
- Near-complete regeneration
- Original mainly affects composition
- Essentially txt2img with slight guidance
- Use for: variations, when you want something similar but different
Finding the Right Strength
Start at 0.5 and adjust:
- Result too similar to input? Increase strength.
- Result losing important details? Decrease strength.
- Sweet spot varies by use case and model.
Common img2img Use Cases
1. Style Transfer
Transform photos into different artistic styles.
Example workflow:
- Input: Photo of a landscape
- Prompt: "oil painting, impressionist style, vibrant colors"
- Denoise: 0.5-0.7
- Result: Photo composition with painted aesthetic
Best practices:
- Higher denoise for dramatic style change
- Include style keywords in prompt
- Test multiple denoise values
2. Image Refinement
Improve or fix generated images.
Example workflow:
- Input: txt2img result with minor issues
- Prompt: Same or enhanced prompt
- Denoise: 0.3-0.5
- Result: Refined version with fixes
Best practices:
- Lower denoise to preserve what works
- Focus prompt on areas needing improvement
- Multiple passes can compound improvements
3. Upscaling Enhancement
Improve quality while increasing resolution.
Example workflow:
- Input: Low-resolution image (upscaled traditionally first)
- Prompt: Detailed description of content
- Denoise: 0.3-0.5
- Result: Higher quality with added detail
This differs from simple upscaling, which can't add true detail. img2img actually generates new details appropriate to the content.
4. Character Variations
Create variations of characters or scenes.
Example workflow:
- Input: Character image you like
- Prompt: Modified description (different outfit, pose adjustment)
- Denoise: 0.4-0.6
- Result: Same character with requested changes
Best practices:
- Lower denoise preserves identity better
- Be specific about desired changes
- Use with LoRAs for better consistency
5. Photo to Illustration
Convert photos to illustrated styles.
Example workflow:
- Input: Real photograph
- Prompt: "anime style illustration" or "digital art"
- Denoise: 0.6-0.8
- Result: Illustrated version of photo
6. Sketch to Finished Art
Complete rough sketches or drawings.
Example workflow:
- Input: Hand-drawn sketch or rough concept
- Prompt: Detailed description of desired output
- Denoise: 0.7-0.9
- Result: Finished artwork following sketch structure
This is powerful for artists who sketch traditionally but want AI to assist with finishing.
Free ComfyUI Workflows
Find free, open-source ComfyUI workflows for techniques in this article. Open source is strong.
img2img in Different Tools
ComfyUI
In ComfyUI, img2img is achieved through the standard workflow with modifications:
- Load your input image
- Encode it with VAE Encode
- Connect to KSampler with appropriate denoise value
- The denoise parameter directly controls transformation amount
Key nodes:
- Load Image: Brings in your source
- VAE Encode: Converts to latent space
- KSampler: denoise parameter is your strength control
For detailed ComfyUI workflows, see our ComfyUI workflow organization guide.
AUTOMATIC1111
In the img2img tab:
- Upload image to input
- Write prompt
- Adjust "Denoising strength" slider
- Generate
Apatero
Apatero.com provides img2img through the image input options. Upload your source image and adjust transformation strength in the interface.
Advanced img2img Techniques
Multi-Pass Refinement
Instead of one high-denoise pass, do multiple low-denoise passes.
Example:
- Pass 1: 0.3 denoise, general refinement
- Pass 2: 0.3 denoise, detail enhancement
- Pass 3: 0.2 denoise, final polish
Result: More controlled transformation than single 0.8 pass.
Progressive Enhancement
Start with high denoise, gradually reduce.
Example:
- Pass 1: 0.7 denoise, major style change
- Pass 2: 0.4 denoise, refine new style
- Pass 3: 0.2 denoise, final details
This applies dramatic changes while maintaining control.
Regional img2img
Different denoise for different areas.
In ComfyUI: Use masking to apply different denoise values to different regions. High denoise on areas you want changed, low on areas to preserve.
Use case: Changing a character's outfit while keeping their face identical.
Want to skip the complexity? Apatero gives you professional AI results instantly with no technical setup required.
Combining with ControlNet
img2img provides content, ControlNet provides structure.
Example workflow:
- Input image sets base content
- ControlNet (edge detection) locks composition
- img2img transforms within those constraints
This gives maximum control over results.
img2img vs Inpainting
People often confuse these:
img2img:
- Transforms entire image
- Global changes
- Denoise affects everything
Inpainting:
- Transforms only masked region
- Selective changes
- Rest of image untouched
When to use each:
- Want to change overall style? img2img
- Want to fix specific area? Inpainting
- Want variation of whole image? img2img
- Want to add/remove something specific? Inpainting
Both are essential techniques. Learn more about inpainting in our AI image editing guides.
Common Problems and Solutions
Problem: Result Looks Nothing Like Input
Cause: Denoise too high
Solution: Reduce denoise to 0.4-0.5, increase gradually if needed
Problem: Changes Barely Visible
Cause: Denoise too low
Solution: Increase denoise, ensure prompt clearly describes desired changes
Problem: Faces Getting Distorted
Cause: Face area receiving too much noise
Earn Up To $1,250+/Month Creating Content
Join our exclusive creator affiliate program. Get paid per viral video based on performance. Create content in your style with full creative freedom.
Solutions:
- Reduce overall denoise
- Use inpainting on face only
- Apply FaceDetailer after img2img
- Use lower strength for portrait work
Problem: Losing Important Details
Cause: Denoise erasing features prompt doesn't mention
Solution: Include all important features in prompt, even if keeping them. "A woman with red hair and blue eyes" if you want to keep those specific features.
Problem: Colors Going Wrong
Cause: Model interpreting prompt color differently than input
Solutions:
- Specify exact colors in prompt
- Use color-specific terms
- Try different denoise values
- Some models handle color better than others
Problem: Inconsistent Results
Cause: High denoise creates variation between generations
Solutions:
- Lower denoise for more consistency
- Lock seed for reproducible results
- Use ControlNet for structural consistency
Best Practices for Production Work
Start Conservative
Begin with lower denoise (0.3-0.4) and increase. Easier to add change than remove it.
Match Resolution
Input image resolution affects output. For best results:
- Use input resolution close to model's native resolution
- Or resize input to target dimensions first
Prompt Completeness
Unlike txt2img, img2img prompts should describe EVERYTHING in the final image, not just changes. The AI uses the prompt as guidance for what to preserve and what to modify.
Test Before Committing
Before processing hundreds of images:
- Test on single image
- Try 3-5 denoise values
- Find optimal settings
- Then batch process
Preserve Originals
Always keep original images. img2img is destructive to originals if overwritten. Work on copies.
img2img for AI Influencer Workflows
img2img is valuable for AI influencer content creation:
Outfit Changes
- Generate base character image
- img2img with clothing description changes
- Low denoise (0.3-0.4) preserves face
- Result: Same person, different outfit
Pose Refinement
- Generate character in approximate pose
- img2img to refine pose details
- Medium denoise (0.4-0.5)
- Result: Better pose, same character
Style Consistency
- Take best character image
- img2img new images to match style
- Creates consistent aesthetic across images
For complete AI influencer workflows, see our comprehensive tutorial.
Frequently Asked Questions
What's the best denoise strength?
There's no universal best. 0.5 is a good starting point. Adjust based on how much change you want.
Can I img2img any image?
Yes, any image works as input. Quality and resolution affect results.
Does img2img work with all models?
Most diffusion models support img2img. Workflow details vary between interfaces.
Is img2img faster than txt2img?
Similar speed at same step count. Sometimes faster because lower denoise needs fewer steps.
Can I convert photos to specific character LoRAs?
Yes, img2img + character LoRA can transform photos while applying learned character features.
What resolution should my input be?
Match the model's native resolution or your target output resolution.
Why does my img2img look worse than the input?
Denoise too high, prompt doesn't describe important features, or model limitations. Try lower denoise.
Can I batch process img2img?
Yes, most interfaces support batch img2img with consistent settings.
Does seed matter for img2img?
Yes. Same seed + same settings = reproducible results. Different seeds create variations.
How is img2img different from ControlNet?
img2img uses image content directly. ControlNet extracts structural information (edges, depth) as guidance. They can be combined.
Wrapping Up
img2img transforms AI image generation from one-shot creation to iterative refinement. Understanding denoise strength gives you precise control over how much the AI changes.
Key concepts:
- Denoise strength controls transformation amount
- Lower denoise = more preservation
- Higher denoise = more creativity
- Prompt describes entire final image
- Multiple passes give more control than single high-denoise pass
Master img2img and you'll find yourself using it more than txt2img for production work. The ability to guide the AI with an existing image opens possibilities that text alone cannot achieve.
For hands-on practice, Apatero.com offers img2img functionality without local setup. For advanced workflows in ComfyUI, explore our ComfyUI guides.
Quick Reference: Denoise Settings
| Use Case | Denoise Range | Notes |
|---|---|---|
| Minor refinement | 0.2-0.3 | Subtle changes only |
| Style transfer (gentle) | 0.4-0.5 | Recognizable but transformed |
| Style transfer (strong) | 0.6-0.7 | Major aesthetic change |
| Sketch to art | 0.7-0.9 | Significant generation |
| Variations | 0.5-0.6 | Similar but different |
| Face preservation | 0.3-0.4 | Keep identity intact |
| Complete reimagining | 0.8-1.0 | Near txt2img freedom |
Next Steps
Once comfortable with basic img2img:
- Combine with ControlNet for structure + content control
- Learn inpainting for selective modifications
- Explore multi-pass workflows for complex transformations
- Use IPAdapter for reference-based generation alongside img2img
The img2img technique is foundational. Every advanced workflow builds on understanding how denoise strength affects the balance between input preservation and AI creativity.
Ready to Create Your AI Influencer?
Join 115 students mastering ComfyUI and AI influencer marketing in our complete 51-lesson course.
Related Articles
Adobe Firefly vs Midjourney vs Ideogram 2026: Which Wins
Brand-safe licensing, scroll-stopping aesthetics, or text rendering. Three tools optimized for three different jobs, tested against real briefs.
AI Architecture Rendering 2026: Veras vs Paintit vs Midjourney
44 percent of architects use AI in 2026. Veras, Paintit, ArchiVinci, and Midjourney tested on five real architectural briefs from a working studio.
AI Art Market Statistics 2025: Industry Size, Trends, and Growth Projections
Comprehensive AI art market statistics including market size, creator earnings, platform data, and growth projections with 75+ data points.