Qwen-Image-Layered: AI Layer Decomposition That Works Like Photoshop
Master Qwen-Image-Layered for automatic image layer decomposition. Complete guide with ComfyUI setup, API usage, and real editing workflows.
Qwen-Image-Layered automatically decomposes any image into separate RGBA layers that you can edit independently, just like working with Photoshop layers but without the hours of manual masking. Released by Alibaba's Qwen team on December 19, 2025, this model transforms how we approach image editing by giving AI the ability to understand what belongs together in an image and separate it accordingly.
:::tip[Key Takeaways]
- Key options include Image Encoding and Layer Planning
- Multiple approaches exist depending on your goals
- Staying informed helps you make better decisions
- Hands-on experience is the best way to learn :::
Why I'm Excited About Qwen-Image-Layered
Look, I've spent way too many hours manually masking objects in Photoshop. The pen tool and I have a complicated relationship. So when Alibaba dropped Qwen-Image-Layered last week, I immediately started testing it.
Here's the thing that blew my mind. I threw a complex scene at it with a person, some furniture, a plant, and a window. The model separated everything into clean RGBA layers in about 30 seconds. Each layer had proper transparency. The edges were clean. I could move the plant to a different spot, change the person's shirt color, and swap out the background, all without touching a selection tool.
This isn't just another AI gimmick. This is genuinely solving a problem that costs professional designers hours every single day.
- How Qwen-Image-Layered works under the hood (RGBA-VAE architecture)
- Three ways to use it: fal.ai API, local Python, or ComfyUI
- Practical editing workflows for recoloring, repositioning, and replacement
- Recursive decomposition for complex multi-layer scenes
- Hardware requirements and optimization strategies
- Real-world use cases from product photography to game asset creation
What is Qwen-Image-Layered?
Qwen-Image-Layered is an image decomposition model that takes any image and splits it into multiple transparent PNG layers. Unlike traditional background removal tools that give you a binary foreground/background split, this model intelligently separates every distinct element in the image into its own layer.
The technical paper on arXiv describes it as achieving "inherent editability via layer decomposition." In plain English, the AI figures out what objects and elements belong together and outputs them as separate layers you can manipulate individually.
The Architecture That Makes It Work
Alibaba's team built three key innovations to make this happen:
1. RGBA-VAE (Variational Autoencoder) Traditional VAEs work with RGB images, which have three color channels. Qwen-Image-Layered introduces an RGBA-VAE that understands transparency as a first-class concept. This is what allows it to output clean, properly masked layers instead of messy cutouts.
2. VLD-MMDiT (Variable Layers Decomposition MMDiT) The magic happens here. This architecture can decompose an image into any number of layers, from 1 to 10 or more. You tell it how many layers you want, and it figures out the best way to split the content. Want three simple layers? Done. Need eight detailed layers for a complex scene? It handles that too.
3. Multi-stage Training on PSD Files Here's the clever part. The team built a pipeline to extract training data from actual Photoshop documents. They analyzed how professional designers organize layers and taught the model to replicate that logic. So the layer separations feel natural, not arbitrary.
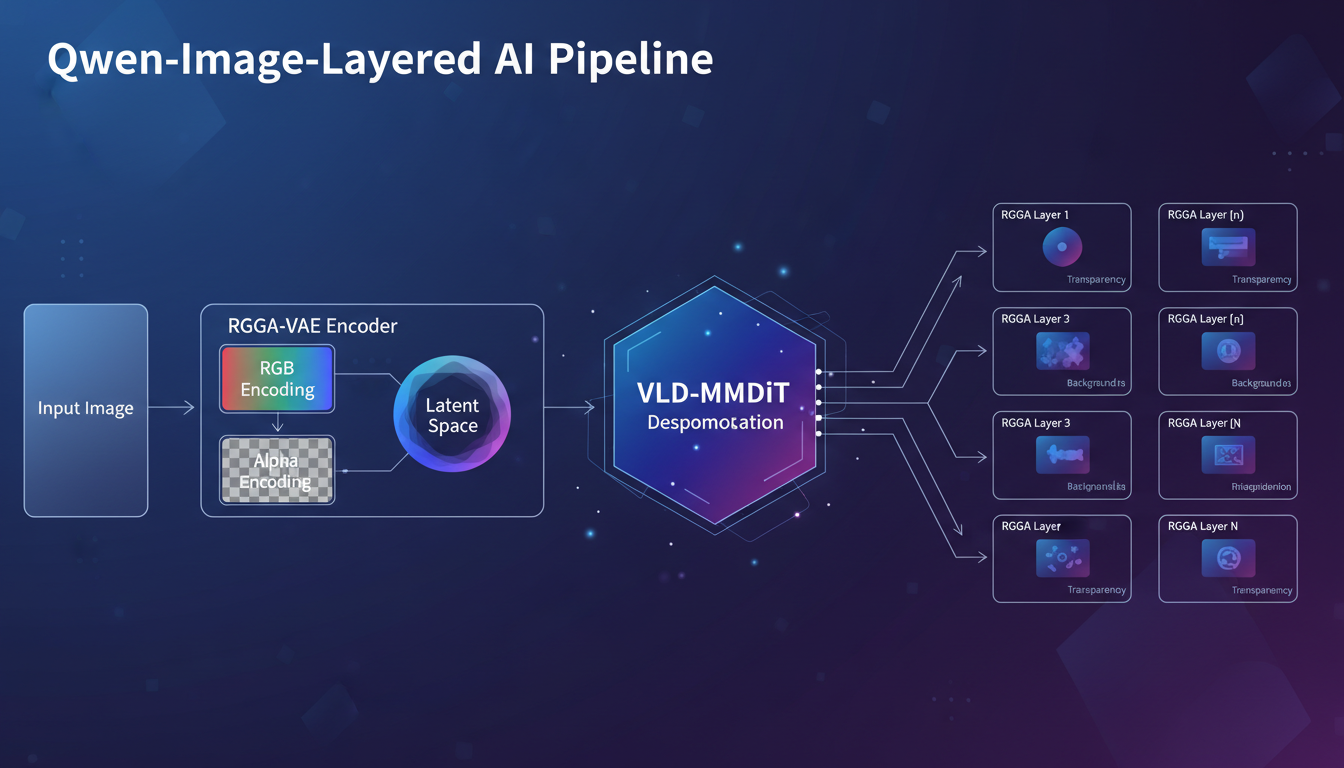 The Qwen-Image-Layered architecture processes images through RGBA-VAE encoding and VLD-MMDiT decomposition
How Does Layer Decomposition Actually Work?
When you feed an image into the model, here's what happens behind the scenes:
- Image Encoding: The RGBA-VAE compresses your image into a latent representation that preserves both color and transparency information
- Layer Planning: The VLD-MMDiT analyzes the latent space and determines how to segment it into your requested number of layers
- Recursive Decomposition: Optionally, any layer can be further decomposed into sub-layers
- RGBA Decoding: Each layer is decoded back into a full-resolution PNG with proper alpha transparency
The result is a stack of PNG files that, when composited together, recreate your original image. But now you can edit each piece independently.
Variable Layer Decomposition in Practice
I tested this with a product photo of a coffee maker. Asked for 4 layers and got:
- Layer 1: The coffee maker body
- Layer 2: The coffee pot
- Layer 3: The shadow and reflections
- Layer 4: The background surface
Then I requested 8 layers for the same image:
- Layers 1-3: Coffee maker split into base, water reservoir, and top brewing section
- Layer 4: Coffee pot
- Layer 5: Steam/vapor effects
- Layer 6: Soft shadows
- Layer 7: Hard shadows
- Layer 8: Background
The model genuinely understood the hierarchy of elements and created logical separations. Not perfect every time, but impressively consistent.
Three Ways to Use Qwen-Image-Layered
Option 1: fal.ai API (Easiest)
If you want to try this without any setup, fal.ai hosts the model and charges $0.05 per image. Here's a quick Python example:
import fal_client

result = fal_client.subscribe(
    "fal-ai/qwen-image-layered",
    arguments={
        "image_url": "https://example.com/your-image.jpg",
        "num_layers": 4,
        "guidance_scale": 5,
        "num_inference_steps": 28
    }
)

## result.images contains your separated layers
for i, layer in enumerate(result.images):
    print(f"Layer {i}: {layer.url}")
API Parameters You Should Know:
num_layers: 1-10, defaults to 4guidance_scale: 1-20, defaults to 5 (higher = stricter adherence to detected objects)num_inference_steps: 1-50, defaults to 28 (more steps = better quality, slower)output_format: PNG or WebP
For most use cases, the defaults work well. I've found bumping guidance_scale to 7-8 helps with complex scenes where elements overlap.
Option 2: Local Python Installation
For batch processing or privacy-sensitive work, run it locally. You'll need a GPU with at least 16GB VRAM for comfortable operation.
## Install dependencies
pip install git+https://github.com/huggingface/diffusers
pip install python-pptx transformers>=4.51.3

## Download the model
## It's available on HuggingFace: Qwen/Qwen-Image-Layered
Basic usage:
from diffusers import QwenImageLayeredPipeline
import torch
from PIL import Image

pipeline = QwenImageLayeredPipeline.from_pretrained("Qwen/Qwen-Image-Layered")
pipeline = pipeline.to("cuda", torch.bfloat16)

image = Image.open("your-image.png").convert("RGBA")

output = pipeline(
    image=image,
    generator=torch.Generator(device='cuda').manual_seed(42),
    true_cfg_scale=4.0,
    num_inference_steps=50,
    layers=4,
    resolution=640  # Recommended for current version
)

## Save each layer
for i, layer in enumerate(output.images):
    layer.save(f"layer_{i}.png")
One thing I learned the hard way. The resolution=640 parameter is important right now. The model was trained at this resolution, and going higher sometimes produces artifacts. Alibaba will likely release higher-resolution variants later.
Option 3: ComfyUI Integration
Qwen-Image-Layered already has native ComfyUI support. If you're already using ComfyUI for your AI workflows, this integrates smoothly.
First, install the required nodes. The community has already created wrapper nodes that expose all the model parameters. Check the ComfyUI Wiki announcement for the latest installation instructions.
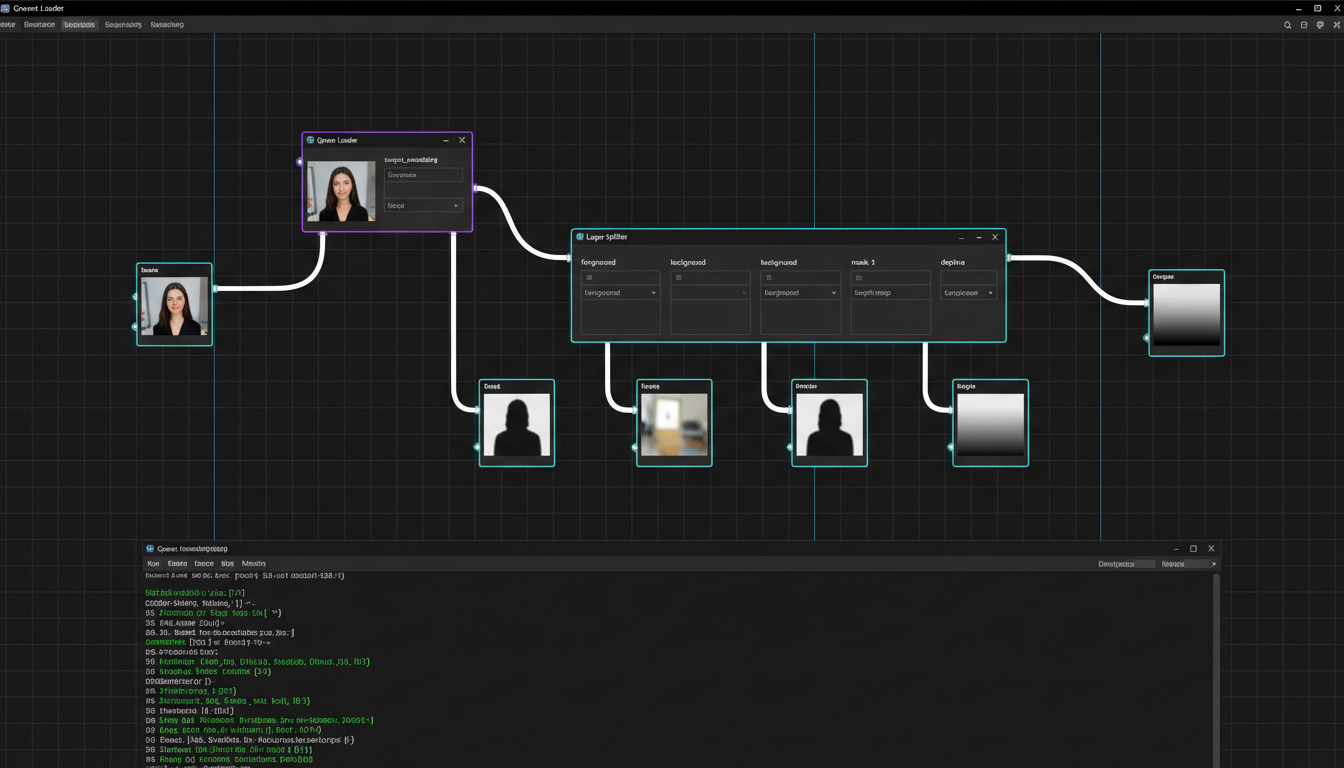 A basic ComfyUI workflow showing the Qwen-Image-Layered loader and layer output nodes
The advantage of ComfyUI is chaining operations. Decompose an image, apply different LoRAs or edits to specific layers, then recomposite. You can build complex editing pipelines that would be impossible with the standalone model.
If you're new to ComfyUI, my beginner's guide will get you set up quickly.
Free ComfyUI Workflows
Find free, open-source ComfyUI workflows for techniques in this article. Open source is strong.
Practical Editing Workflows
Alright, let's get into the good stuff. Here's how I've been using this in actual projects.
Workflow 1: Recoloring Specific Elements
Say you have a product photo and the client wants to see the item in five different colors. Traditionally, you'd mask the product, adjust hue/saturation, and hope the results look natural. Repeat five times.
With Qwen-Image-Layered:
- Decompose the image into layers (product, shadow, background)
- Take the product layer only
- Apply color transformations to just that layer
- Recomposite with original shadows and background
The shadows stay consistent because they're on a separate layer. The lighting looks natural because the transparency gradients are preserved. Five color variants in minutes instead of hours.
Workflow 2: Object Repositioning
Moving objects in photos usually means cloning, healing, and carefully rebuilding the background where the object used to be. Tedious work.
Better approach:
- Decompose the scene
- Identify the layer containing the object you want to move
- Transform that layer (move, scale, rotate)
- Use AI inpainting to fill the gap left behind in lower layers
- Recomposite
I tested this with a portrait where I wanted to reposition a decorative plant. The model separated the plant cleanly, I moved it, used Qwen-Image-Edit to fill the background gap, and composited everything back together. The whole process took maybe five minutes.
Workflow 3: Content Replacement
This is where layer decomposition really shines. Want to swap the subject's outfit? Replace a product with a different model? Change the background entirely?
Having separate layers means you can replace any layer with completely new content. The other layers provide context for how lighting and shadows should work in the new composition.
I've been using this for virtual try-on workflows. Decompose a fashion photo, replace the clothing layer with a new garment, adjust shadows to match, and you have a realistic product shot without an actual photo shoot.
If all this sounds complicated, platforms like Apatero.com handle layer-based editing automatically. Upload your image, describe what you want changed, and the platform manages the decomposition and recomposition behind the scenes.
Recursive Decomposition: Going Deeper
Here's a feature most people overlook. Any layer can be further decomposed into sub-layers. The model supports this natively.
Want to skip the complexity? Apatero gives you professional AI results instantly with no technical setup required.
Say you decomposed a scene and got a "furniture" layer. But you actually need the table and chairs separated. Just run the furniture layer through the model again and ask for more layers. It'll split that layer into its component objects.
In theory, you can do this infinitely. In practice, I've gone about three levels deep before the separations start getting questionable. But for most editing tasks, two levels of decomposition is plenty.
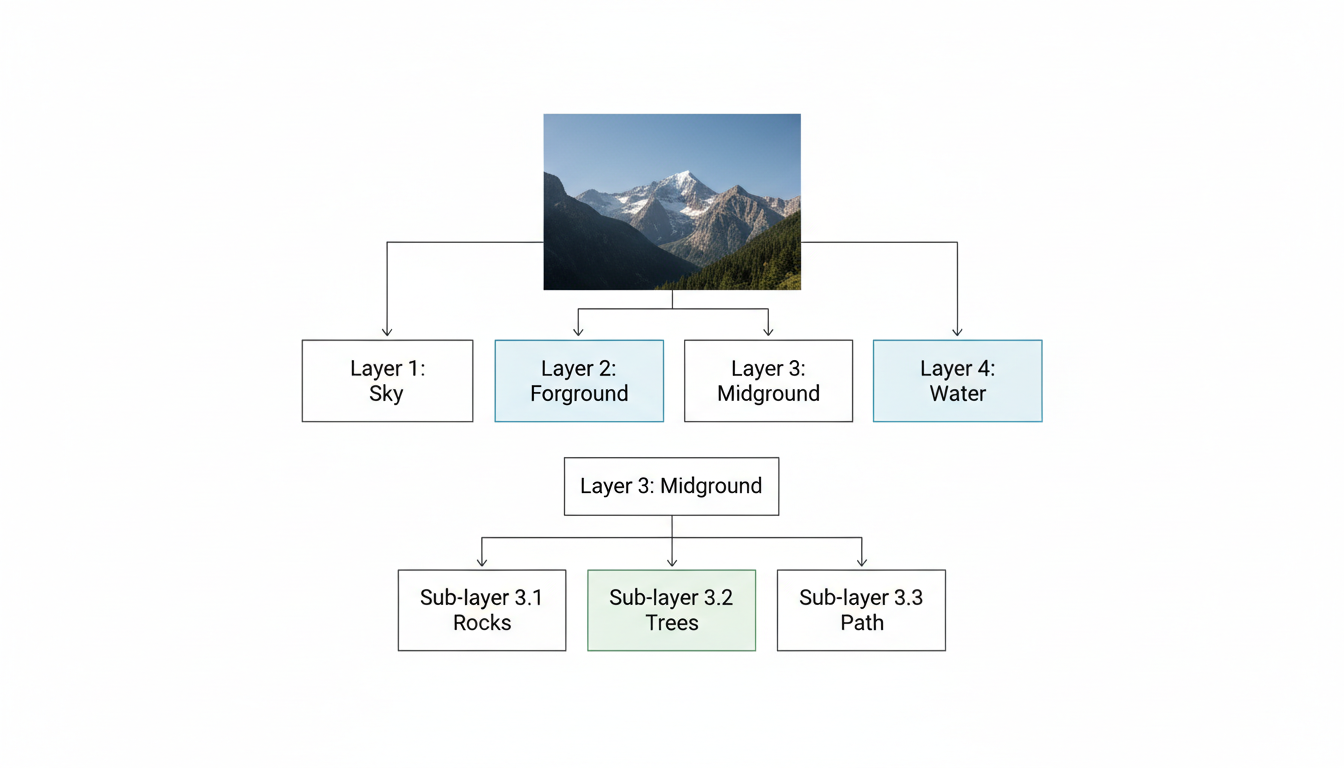 Recursive decomposition allows any layer to be further split into sub-layers for granular editing
Hardware Requirements and Optimization
Let's be real about what you need to run this locally.
Minimum Specs:
- GPU: 12GB VRAM (works but tight)
- RAM: 16GB
- Storage: 15GB for model files
Recommended Specs:
- GPU: 16GB+ VRAM (RTX 4080, 3090, A5000)
- RAM: 32GB
- Storage: SSD strongly recommended
Optimization Tips:
- Use
torch.bfloat16precision instead of full float32 - Process one image at a time to manage VRAM
- Keep resolution at 640 for now
- Enable memory-efficient attention if using xformers
For lower-spec systems, the fal.ai API is honestly the better choice. You're paying $0.05 per image, which is cheap compared to the frustration of OOM errors. I covered more optimization strategies in my low VRAM guide.
Real-World Use Cases
After a week of testing, here are the use cases where I see the most value:
Product Photography
E-commerce teams can decompose product shots, swap backgrounds instantly, create color variants, and generate lifestyle compositions without reshooting. One product photo becomes dozens of variations.
Game Asset Creation
Extract characters, props, and environments from concept art into separate layers. Import directly into game engines as sprite sheets or 2D assets. Check out my game asset guide for more on this workflow.
Content Creation for AI Influencers
Create consistent character images where you can swap outfits, backgrounds, and accessories while keeping the character layer identical. Perfect for AI influencer workflows where consistency matters.
Earn Up To $1,250+/Month Creating Content
Join our exclusive creator affiliate program. Get paid per viral video based on performance. Create content in your style with full creative freedom.
Graphic Design Templates
Decompose existing designs to create editable templates. Swap text layers, update images, change colors, all while maintaining the original composition's balance.
Video Production
Extract foreground elements from still frames, modify them, and use for compositing in video projects. Faster than rotoscoping for many use cases.
Limitations and What Doesn't Work
I'm going to be honest about where this model struggles.
Text Generation is Limited The model is specifically fine-tuned for image decomposition. If you try using the text-to-image capabilities, results are inconsistent. Stick to image-to-layers workflows.
Complex Overlapping Objects When objects significantly overlap and intertwine, the layer separations can get messy. A person standing clearly in front of a background? Perfect. Two people hugging? Expect some bleed between layers.
Fine Details Hair, fur, and wispy elements sometimes end up split awkwardly across layers. The alpha channels are good but not perfect for highly detailed edges.
Consistency Across Decomposition Counts Asking for 4 layers versus 8 layers can give you quite different organizations. If you need specific elements isolated, you might need to experiment with layer counts.
Prompt Guidance is Minimal You can't really direct which objects go to which layers. The model decides based on its training. This is both a feature (you don't need to specify everything) and a limitation (you can't override its decisions).
Comparison: Qwen-Image-Layered vs Other Layer Extraction Methods
| Method | Automated? | Layer Count | Quality | Speed | Cost |
|---|---|---|---|---|---|
| Photoshop Manual | No | Unlimited | Perfect | Slow | $22/month |
| Remove.bg | Yes | 2 (fg/bg) | Good | Fast | $0.20/image |
| SAM (Segment Anything) | Semi | Many | Good | Medium | Free |
| Qwen-Image-Layered | Yes | 1-10+ | Very Good | Medium | Free/$0.05 |
Qwen-Image-Layered hits a sweet spot. It's more flexible than simple background removers, more automated than SAM-based workflows, and produces cleaner layers than most alternatives.
What's Coming Next?
Based on the GitHub repository and research paper, Alibaba is actively developing this technology. I'd expect:
- Higher resolution support beyond 640px
- Better control over layer organization
- Integration with Qwen-Image-Edit for in-layer modifications
- Possibly video layer decomposition
The Apache 2.0 license means the community will likely build extensions too. I'm watching for LoRA fine-tunes that specialize in specific decomposition styles.
Frequently Asked Questions
Is Qwen-Image-Layered free to use commercially?
Yes. The model is released under Apache 2.0 license, which allows commercial use. You can use it for client work, products, or services without licensing fees.
How is this different from background removal tools?
Background removal gives you two layers, foreground and background. Qwen-Image-Layered can decompose images into 10+ layers, separating every distinct element into its own editable layer with proper transparency.
Can I run Qwen-Image-Layered on a Mac?
The model is designed for CUDA GPUs. Mac users would need to use the fal.ai API or wait for community ports to MPS/Metal. No official Apple Silicon support yet.
What image formats does it accept?
PNG, JPEG, and WebP inputs work. Output is always PNG with alpha transparency, or WebP if you specify that format in the API.
How long does layer decomposition take?
On a modern GPU (RTX 4080), expect 15-30 seconds per image at default settings. The fal.ai API is similar. More inference steps increase quality but also processing time.
Can I specify which objects go to which layers?
Not directly. The model decides layer organization based on its training. You control the number of layers, but not the specific assignments. Recursive decomposition can help isolate specific elements.
Does it work with transparent input images?
Yes, the RGBA-VAE handles transparency natively. You can feed it PNGs with existing alpha channels and it will preserve and work with that transparency information.
What resolution should I use?
Currently, 640px on the longest edge is recommended. The model was trained at this resolution and produces the best results. Higher resolutions may work but can introduce artifacts.
Can I export the layers to Photoshop?
Yes. The local installation includes PowerPoint export, and the PNG layers can be imported into Photoshop as a layered document. Each PNG becomes its own layer.
Is there a quality difference between API and local?
No significant difference. The fal.ai API runs the same model with the same settings. Choose based on convenience, cost, and privacy requirements rather than quality expectations.
Wrapping Up
Qwen-Image-Layered represents a genuine step forward in AI-assisted image editing. The ability to automatically decompose any image into editable layers solves a problem that's cost designers countless hours.
Is it perfect? No. Complex scenes with overlapping elements still need manual cleanup. The resolution limitation is frustrating. And you can't precisely control layer assignments.
But as a first release, this is impressive. I'm already integrating it into my production workflows, particularly for product photography and content creation where layer flexibility saves significant time.
The quick start path:
- Try it on fal.ai for $0.05/image
- If you like it, set up local installation for batch processing
- Integrate with ComfyUI for complex editing pipelines
Or if you want everything handled automatically, Apatero.com's image editing features use similar layer-based technology behind the scenes, giving you the benefits without the technical overhead.
The future of image editing is layer-aware AI. Qwen-Image-Layered is just the beginning.
Sources:
Ready to Create Your AI Influencer?
Join 115 students mastering ComfyUI and AI influencer marketing in our complete 51-lesson course.
Related Articles

10 Best AI Influencer Generator Tools Compared (2025)
Comprehensive comparison of the top AI influencer generator tools in 2025. Features, pricing, quality, and best use cases for each platform reviewed.

5 Proven AI Influencer Niches That Actually Make Money in 2025
Discover the most profitable niches for AI influencers in 2025. Real data on monetization potential, audience engagement, and growth strategies for virtual content creators.

AI Action Figure Generator: How to Create Your Own Viral Toy Box Portrait in 2026
Complete guide to the AI action figure generator trend. Learn how to turn yourself into a collectible figure in blister pack packaging using ChatGPT, Flux, and more.